LD29 April 25–28, 2014

Dodge, quite a while later.

Back in LD26, I made a game called Dodge. I thought it was pretty great, and it seems that the community agreed. Recently, I built it again from scratch, with a bunch of new features, some levels and the greatest options menu ever to exist.

Runner 2014-06-13 16-29-21-74The title screen, now with nothing new.

Runner 2014-06-13 16-30-58-51

The midst of a default game on Level Infinity.

Runner 2014-06-13 16-31-29-54

The midst of a slightly customised game on Level Infinity.

Whereas the LD26 version featured the ability to endlessly dodge black squares on a 3×3 grid, this version allows one to dodge black squares and black rectangles on an ever-changing (if you want) grid and possibly also collect outlines of squares, if you want to do that. You can very heavily customise the game, to make it as easy or as difficult as you please.

I am now in need of other people to tell me of the flaws and merits of this game, and if they so desire, make suggestions. If you would like to do this, do say so and I shall give you a link.

Something MSDOS-y for Mini LD 52

Well, I’ve made a start on my Mini LD 52 project, making some kinda game for MSDOS 😛

The good news is I’m up and running with some basic input and graphics!

The “bad news” is my progress so far is basically a rudimentary etch-a-sketch:

For those interested I’m using the following bits and bobs for this:

Oracle VirtualBox, running MSDOS 6.22 on a VHD

VHD means I can mount it in Windows 😉 so can use Notepad++ for most of my coding, and also mount that path in DOSBox for testing the game in the way it’ll be run by most.

I’m also using a DOS port of vi when I need to quickly edit a file in the DOS environment.

OpenWatcom is compiling and linking my C++ for me :)

If I get as far as some actual bitmappy graphics, I’ll be using Deluxe Paint II Enhanced for MSDOS.

Sound and music are kind of on the backburner at the moment, when I start thinking about them I’ll decide what DOS-based tools to use!

LoveDOS

A small test game running in LoveDOS

A small test demo running in LoveDOS

In preparation for MiniLD52 I wrote a small framework for making 2D DOS games in Lua; the framework provides a loose subset of the Love2D API. Currently it supports only a single image format and runs in mode 13h: 320×200, 8bit. It doesn’t yet provide sound, scaling/rotation or mouse support.

If you want to give it a go, check out the “Getting started” section on the project’s github. If you encounter any issues then leave me a comment; given how new the project is, it may have some bugs, but hopefully there isn’t anything too major.

Though the framework has been tested on DOS, as well as on an emulation of older hardware, I haven’t had a chance to see how it runs on real older hardware. If you happen to have an early Pentium 1 and wouldn’t mind trying out some little test programs on the framework and reporting back the kind of FPS you get, let me know!

My first NES game for Mini LD 52

The last weekend, I was still hesitating between making an action game for Amstrad CPC using BASIC (like when I was child) or doing something new. Finally after consulting various tutorials, I decided yesterday to start on programming a NES game in assembler… what I would have dreamed of as a child.

Tutorials:

Tools:

  • NESASM
  • FCEUXD SP
  • YY-CHR
  • Tile Molester

Here’s a screenshot of my (very simple) game after a first day of work:

meteors-0

This is a one-button game. The flying saucer goes right when you press the A button and left otherwise. Of course, you have to avoid asteroids. My first feeling is that the NES is very pleasant to program (hardware scrolling, hardware sprites and so on).

Obviously there is a lot to improve… to start by changing this ugly color palette!


Tags: MiniLD #52

Seriously late post mortem…

Ok, this is a bit embarassing… It’s been almost 2 months and I still haven’t posted my post mortem for LD29. I actually had some rough thoughts written down right after the compo but have been postponing writing a proper post because of school and such… I know, excuses, excuses… So anyway, here goes:

The bad

  • Idea was not very coherent – This time around I spent less time thinking up an idea and started a little quicker. The problem was that I had a few loose ideas which seemed nice at first, but later I had a hard time getting them to fit together.
  • Panic – Because of the above, some time around the middle of the compo I was worried I wouldn’t be able to finish anything playable and was starting to think about quitting.
  • Not enough polish – Some parts of the game were a little rushed, like the level design (same problem as in my last compo, will I ever learn? :P). Other things that could use some more love: the graphics, the HUD and I’m also not 100% happy with the “physics”.

The good

  • Kind of fun movement mechanics – This was what prevented me from giving up on the game. I wasn’t sure if my overall gameplay ideas made any sense but in my moment of weakness I just sat and played around with the small prototype that I had so far. I noticed that the movement mechanics, though kind of wonky, were pretty fun and I decided to keep going, thinking that at the very least I’d have a boring game with fun character movement.
  • Ideas somehow fit together in the end – I threw in most of the elements I wanted to include and to my surprise something more or less playable came out…

Other observations

  • Even simple platformer physics take time to code (compared to simple top-down movement).
  • Pixel-based maps are fun and easy to edit.

Next time

  • Spend more time on graphics to get a nice art style?
  • Don’t worry so much about finishing.
  • Get something playable on day 1 (and later polish).
  • Maybe finally make some music…
  • Start playing with level design early (having an interesting map helps to come up with game mechanics).

Copycats and protecting against them

It hurts to see that most lovely game ideas and even complete games get ripped, copied and being sold. It makes it impossible for those who had the idea to improve it beyond “good”. So what would be the good kind of “protection” against this?

It’s never impossible to copy or even recreate if they want to. (re-engineering get’s easier by the day). The thing is, you shouldn’t rely on the product you create. You should rely on your ideas. Rely on the experience you design instead of the product itself. Keep developing, keep ahead of your competition and copycats. Everything gets copied from books, movies, games up to houses. Did you know they remodelled Paris and Venice in the USA and even bigger in China? It’s a small sized mini-Paris city. Things get already copied before they’re a day old. Don’t rely on your product, rely on your innovative ideas. Create your space, your slice of the world where people can sign up and enjoy your ideas (a brand so to say) instead of a single product at a time. That’s what Ludum Dare could be, beyond the compo, it’s own brand where people come to enjoy the fresh ideas of the community.

Image from http://www.dailymail.co.uk/news/article-2384036/Inside-Chinas-mini-Paris-Town-built-look-just-like-French-capital-complete-Eiffel-Tower-Champs-Elys-es.html

Image source, daily motion, copy of Paris.

That said, always keep an eye out for copycats. If you can take them down from stores, go ahead, but don’t rely solely on your product that is always copyable.

I regularly compete in the Ludum Dare competition and develop games for companies. I like using these kinds of competitions to get in touch with creative minds and recruit them. If they stop competing it would be a great loss. I designed the online tool GameCreator to easily create and share games or interactive presentations to wherever and whoever you want. It doesn’t contain code in the old sense of the word. But the idea behind it is to easily mock up, extend, improve and share your ideas. Instead of developing a few weeks, mock it in a day, share, improve and share again. Since it’s an online cloud service it’s also a bit harder to directly copy it from the web to an appstore without ripping almost the entire service and its build in protection. Instead they could set up a link and embed in an app’s browser. Which you would always notice in the tool’s analytics. But the game’s source code would always be shareable for the competition.

Feel free to contact me through twitter, linkedin or otherwise.

Tags: cloud, copycats, gamecreator, islandworks, Ludumdare, rex van dorp, stealing, stolen, strong99, tool

Tiny Haunt submitted to IndieCade 2014

Well, after some tuning and graphics updates, I decided to submit Tiny Haunt, my LD29 entry, to IndieCade.  While the LD feedback was vastly positive, there was one common complaint: the game wasn’t hard enough.  I intended the game to be fairly sandboxy, and to that end, fairly easy if you choose.  However, I ran out of time to implement the mechanics that made it more than that.  In the IndieCade build each of the four levels has its own optional challenge, which might be defeating enemies within a certain amount of time, or using only one ability.  I’m happy with the progress I’ve made so far, but there is still so much to do!  A big part of the future experience will be enhanced interactions with enemies and more objects put at your disposal.  On top of that I have plans to add an exploration element that allows you to uncover the long lost secrets of your castle.  Exciting times ahead!

Here’s a preview of the IndieCade build.  If you’re interested in the game, don’t hesitate to follow me on Twitter (@rojomojogogo), or add Tiny Haunt to your watch list on IndieDB.

Tags: IndieCade, ld29, postcompo, tiny haunt, unity, video

First gameplay video of my NES game

Some new features are added to my NES game for the Mini LD 52:

  • The graphics are slightly improved.
  • Asteroid field is denser and therefore more difficult to cross.
  • Collision detection between the flying saucer and asteroids is implemented.

These few features are usually easy to implement with a high-level language, but with assembler, it becomes a challenge…

A short video for having an overview:

meteors3-0

The goal is to avoid asteroids by pressing the A button and going to the right; otherwise, the saucer goes left. When the flying saucer flashes black, it means that a collision is detected but currently, nothing happens.

That’s all for today!

Tags: 8-bit nes assembly homebrew, MiniLD52

Comments

17. Jun 2014 · 20:26 UTC
Cool, I thought that I was the only one creating an NES game. Maybe we can share notes. ;D

I’m starting to work on collision detection in my game. I think it’s going to turn out to be a long series of CMP, BCC, and BCS statements.
19. Jun 2014 · 17:04 UTC
OK I’ll take a look at it…

A Nice Compilation for the Latest Ludum Dare Compo!

I stumbled upon this nice compilation of 20 entries for #LD29 by the YouTuber, IGP (The Indie Game Promoter)

It covers a lot of the higher ranked ones, but I saw quite a few ones that weren’t on the list of high-rankers.

It’s straight to the point, and it seems well edited. I really like the background track, and the games he covers are of a wide-variety.

Anyways, just thought I’d share it!

I have an idea!

HI!

Since I found out for LD I wanted to participate, but since I found out for MiniLDs I was wondering why should not minilds have results like Ludum Dare? Of course I dont 100% know how things have been going here from 2002, but I thought minilds should have some sort of light voting category ( for example – only overall ). I know minilds are suposed to be relaxed, but i want to know what do people think about my entry ( not just by comments, since I havent got any comments for my last entry, LDML ).

I am sorry if this is somewhat stupid idea, but could you please comment what do you think about it?

Comments

20. Jun 2014 · 00:50 UTC
The trouble with that is twofold:
20. Jun 2014 · 04:11 UTC
I know the MiniLD 44 (7dRTS) last year was rated, but I’m not sure how meaningful the ratings were.
Tosic
20. Jun 2014 · 10:50 UTC
@Tim Bumpus

1) I know, but for me, it was exiting to wait for the resluts of voting ( in LD29 )

2) Very few people enter MiniLDs indeed, but I doubt that will be the case if it would have voting option, so in fact it only has one problem.

Although it has problems, I really hope that majority will like my idea!
28. Jun 2014 · 10:49 UTC
We’ve tried it more than once. Most recently for the 7dRTS that I hosted last July.

Electron Runner – Android Game (MiniLD #49 entry)

Hi guys and gal’s

I finally released my latest Android Application (Game) made in jMonkeyEngine.

I wrote this game originally for the 49th Mini Ludum Dare Contest but now I took it a step further and finished it up to be a proper and complete Android game.

Link to old post: http://www.ludumdare.com/compo/minild-49/?action=preview&uid=32655

Can you guys please download it and try it? Any feedback will be awesome. Also if you could rate it I would also appreciate.

Thanks guys

Get it here: https://play.google.com/store/apps/details?id=com.tgiantlab.electron

Here is a small video:

Creating a team

Hello fellow game developers, artists, and musicians. I am 16 and looking to create a team watch this https://www.youtube.com/watch?v=AzKH7N0Gx7w video for more details. Thanks

Finally, some progress.

flappyUfo


From single color blocks with default CPC palette and random pixels for sprite placeholder, to something that looks a bit better, not perfect but I am surprised I came so far. This a CPC+ project, which originally started as an attempt to make flappy bird for CPC+ (which I learn in some news someone already is working on). So, now this is Flappy UFO or something like that, and all I have now is a bouncing sprite that doesn’t collide, smooth scrolling background and raster sky colors (courtesy of CPC+ line interrupts magic!). Hopefully I will finish this tomorrow and it might even have gameplay if I am not too lazy.

Tags: CPC, MiniLD #52

Comments

22. Jun 2014 · 19:02 UTC
I developed a lot of mini-games on CPC when I was a child but only in BASIC. Games with sprites, raster and other made ​​me dream… and I’m still a child when it comes CPC. I can’t wait to test your game!

Astroid: first playable version


Finally, my first nes game is called Astroid. Currently, only the core of the game is developed. There are still many things to improve and complete… the sound, a title screen, etc. Everything is incredibly slow to program in assembler (especially for a beginner).

Click on the screenshot to go directly to the Astroid entry (with rom, source files and gameplay video).

astroid

Of course, all your comments will be very welcome. I’m not sure I have time to rework the game tomorrow… the first playable version might be the last :)


Tags: 8-bit nes assembly homebrew, MiniLD #52

Comments

Tosic
24. Jun 2014 · 16:58 UTC
Hey, it looks cool. Can you please check out (and comment) my entry and I will see yours?

Creating My First NES Game

For this mini-LD challenge, I decided to try to create a game for the original 8-bit Nintendo Entertainment System (NES).  This was the first game console that I ever owned as a kid, so creating a game for it was something that I had always wanted to do.

Unfortunately, to create an NES game, everything has to be written in assembly.  When I was at Georgia Tech working on my computer science undergraduate degree, I did have one project where I had to write assembly code for an emulated MIPS system.  The emulator was called SPIM (MIPS spelled backwards), and it looks like it is still available for download today.  While writing assembly is not completely foreign to me, it definitely is not one of my favorite things to do.  However, it was my only option for creating an NES game, and it was a nice refresher since I had not written any assembly code in years.

Getting a 4x4 tile sprite moving around on the screen

Running NES assembler to get a sprite to move on the screen in the NES emulator

The good news is that I found a great series of tutorials on the basics of creating a NES game written by bunnyboy at NintendoAge.  He also has a wide variety of NES homebrew games available on his site, and an adapter for sale which allows compiled NES games to be played on actual NES hardware using a flash drive.

I started by working through weeks 1 to 5 of the “Nerdy Nights” tutorials.  The first tutorial is the basics of binary and hexadecimal number systems.  The second tutorial goes over the architecture of the NES, and provides a barebones example of an NES game with assembly code and example CHR ROM dump.  I liked this incremental example approach, which allowed me to just to get something to compile and run, before tackling things like sprites and sounds.  I tried a few different NES emulators, but FCEUX seemed to be the one that most people recommended these days.  It was also available for download from the Ubuntu software center, so the installation was simple.  However, the program that is used to compile the NES assembly code called NESASM3 is only offered as a Windows executable, so I had to install Wine to run it.  After the setup was complete, I was successfully able to generate a .NES file, which ran in my NES emulator.  However, it only displayed a blank screen, but it didn’t crash which was a start.

In the third tutorial, it goes into the details of the 6502 assembly code, which is the instruction set used by the NES assembler.  It has all of the standard operators that you would expect, like “load” and “store” for writing to registers and memory.  The NES is a fairly simplistic system, which only has three registers which are the Accumulator, Register X, and Register Y.  The instruction set also has simple math functions like “add” and “subtract”, and control operators like “jump” and “branch”.  The example of this lesson gave enough to get started to change the color of the screen based on the selected palette value.  I tested by changing the screen color to different combinations of red, green, and blue by modifying the binary code of the byte which controls the screen color.

The fourth tutorial made things a little more interesting, as it taught me how to display a sprite to the screen and change its colors by modifying the color palette values.  The color code chart at the top of the page was a very helpful reference.  The fifth tutorial shows how to display even more sprites, and how to move them around on the screen using the controller.  The example code just shows how to detect input from the A and B buttons, so I extended that code to detect all buttons on the NES controller.  The test for the other buttons are just detected by additional “loads” from the from the address of the controller port ($4016).  It also only moved the sprite in the left and right direction, so by writing to the sprite’s Y memory location, I was able to make the sprite move vertically when the up and down buttons are pressed on the virtual D-pad.  The example only moved one “tile” of the sprite, so I extended the assembly code so that it moved all four tiles together.

In order to make the sprites for my game, I used a program called YY-CHR.  It is another Windows executable, but it also runs well under Ubuntu using Wine.  The only issue that I encountered was that I was not able to create a bitmap in Gimp, and then copy and paste it into YY-CHR.  Therefore, I created my own “hand drawn” smiley face sprite, which is made up of four 8×8 pixel tiles.

I quickly discovered that writing everything in assembly was going to be a real pain.  Therefore, I started writing a simple script that would read some parameters out of a file.  Since this is going to be simple, I decided to write the script in Ruby.  First, I took the 6502 assembly that I wrote and broke it into five pieces: the header (which doesn’t change), controls (player input), palette, sprites, and footer (also doesn’t change).  I put each section of assembly into its own text file, and the main nesc.rb script just reads the contents of those files, and then calls NESASM3.exe at the end.  I tested my script, and it successfully compiled an .NES image which I could play in my FCEUX emulator.

However, that isn’t very interesting since it always just compiles into the same game.  As a starting point, I created a game.xml file, and defined four colors which define the four colors of the current palette.  In the included nes_palette.rb file, I started defining colors based on the tutorial table, and stored those color constants and the corresponding hex values into a Hash.  Then, in another script which reads the game.xml file using REXML and XPath, I stored the user’s defined palette colors in array.  Then the palette code just looks up those values in the Hash to get the correct hex values to write palette data using the .db directive.  Finally, I added a <palette> tag to contain these <color> elements.


Changing the palette colors of a sprite using user defined values in an XML file

Changing the palette colors of a sprite using user defined values in an XML file


I expanded my XML file specification format by adding a <player> tag for player attributes.  The first player attribute I added was <speed>, which controls how fast the player moves around on the screen.  This is currently a hexadecimal value, which is either added or subtracted (ADC / SBC) from from the x and y memory locations of the player’s tiles.  In my original code, it only moved one of the player’s tiles, however with my Ruby compiler script I was able to create a simple loop to apply the add or subtract to each tile in the player sprite.  In my user input code, I made a hash table of the user defined values so that it can be passed around to each of the functions.  One issue I had was sometimes the tiles would not move at the correct speed.  I found that this was because  I was not clearing the carry flag.  CLC must be called before every ADC, and SEC must be called before every SBC.

Creating a simple sprite in YY-CHR

Creating a simple sprite in YY-CHR

Now that I had a way to display a sprite to the screen, I needed a way to change the sprite displayed on the screen.  I created a simple rocketship sprite which is four tiles in YY-CHR and saved it to gatechgrad.chr.  In my game.xml file, I created a new tag element called <spritesheet>, which holds the name of the CHR file containing the sprites to use for the game.  I updated my nesc_userinput.rb script to store this value into the userOptions hash table, which is passed to the new nesc_footer.rb which generates the 6502 assembly to read the data from that CHR file.  The NESASM3 assembler will throw a compile time error if the CHR file name is invalid.

While making these updates, I created a Makefile which simply recompiles everything (ruby nesc.rb; wine NESASM3 temp.asm) whenever the game.xml file is updated.

game.xml which defines various properties of the NES game

In the game.xml file, I added a new <sprite> tag inside of the <player> tags, and the <sprite> tag contains multiple <tile> tags which have “row” and “col” as attributes and the tile number (in hexadecimal) as text.  I updated the nesc_userinput.rb again to load all of these values into the user option hash table.  That data then gets used by the nesc_sprites.rb file to write the assembly for the sprite data.  After this was completed, I was successfully able to change which tiles composed the player sprite through the game.xml file.  It is interesting that most sprites for NES games use sequential tiles, where the head may be tiles 0 and 1, body 2 and 3, and feet 4 and 5.  This makes the reads sequential, but it is more difficult to edit a sprite sheet that way since the head, body, and feet are all of the same tile row.  For my game, I just specified 0 and 1 ($00 and $01) as the top part of my ship and 16 and 17 ($10 and $11) as the bottom, that way the sprite is easily editable in the sprite sheet.

The next step is to get the ship shooting.  I added a new bullet tile to the spritesheet using YY-CHR.  In the nes_sprites.rb script, I added a new line to load the bullet sprite.  Then I increased the loop counter in the header to read the new sprite by increasing the CPX value to #$30.  This should actually load 12 tiles, since each tile is defined by 4 bytes (x, attributes, tile index, y).  In the controller code, under the ReadA: label, which is executed when the A button is pressed, I set bullet’s x and y location values to the position of the spaceship.  I used the values of the first spaceship tile, to make things simple for now.  After the control handling code, I added a section to add (CLC/ADC) the bullet speed to the x position of the bullet.  Now, the bullet’s position will fly from left to right on the screen.  In the game.xml file, I added a <bullet> tag which contains <speed> containing the speed of the bullet in hexadecimal, just like the player speed.  This value is read and used to determine the bullet speed in the game.

Unfortunately, when the bullet reaches the right edge of the screen, it will loop back to the left side.  Also, if the A button is repeatedly pressed, the one bullet will reset back to the location of the spaceship.  I created a variable in the assembly code to hold the “alive” flag.  When the A button is pressed, I load a 1 (LDA #$01) and store it in the alive flag.  In the UpdateBullets section, I load the bullet alive flag and compare it with 1 (CMP #$01) and jump to the end of the section if it is not equal (BNE).  This will make the bullet stop if it is not alive.  Using this reference I learned how to check if a value is greater than or less than a number by using the BCC and BCS (“branch carry clear” and “branch carry set”) instructions.  Using BCC, if the bullet’s x location is less than 240 (#$F0) then it will jump to the end of the section, otherwise it will set the alive flag to zero.  I used 240 instead of 255, due to the values looping back around to zero when value exceeds the 255 limit for a byte.  As long as the bullet speed is less than 15 there should be no problems.  There are techniques for checking if the summed value exceeds 255, which is used for 16-bit numbers, so I will investigate that later.  To fix the other bullet position reset problem when A is repeatedly pressed, after the A button is read I simply loaded the bullet alive flag, compared it with one and jumped to the end if it is equal.

Displaying player ship, missile, enemy ship, and score on the game screen.

The next step was to get an enemy on the screen.  I used YY-CHR to create a new enemy ship sprite on my spritesheet, which is another four tile sprite.  I added a new <enemy> tag to my XML file, which contains all of the properties of the enemy.  In the Ruby code, I added an array to hold all of the enemies, and an Enemy class which contains the memory locations of the X and Y position of the enemy.  I also defined an “alive” flag variable for the enemy, so that I can set it to dead when it is destroyed.  In the future, I could also add a life value, if the enemy takes multiple hits to be killed.  To get the enemy moving, I just simply keep subtracting the ship’s speed value to the x location variable, so the enemy will continually keep moving toward the left side of the screen.  This isn’t really impressive, but at least it’s moving which gives the game a bit of a challenge.  When the ship’s “alive” flag is set to zero (#$00), then the enemy ship stops moving.

Displaying text in the game is done by writing the text tiles to background name table.  For my spritesheet, “0” starts at tile $00 and goes up to “9” at tile $09.  The letter “A” starts at tile $0A and goes up to “Z” at $23.  The letter mappings can be seen in the PPU viewer of FCEUX.  Using the technique explained in the tutorial, I was able to display the score up to six digits at the top of the screen.  I created a Hash in the script to map all of the letters to the equivalent tile numbers.  It may be possible to write a function to do this conversion, but I will leave that to do later.

I separated all of the object code into its own Ruby script, which held the memory locations of all of the tiles for each of the objects.  The update code for each of the objects was also moved to another script containing update subroutines.  In the update script, the locations of the tiles are set based on the location of the object, plus an offset which is added based on the tile’s row and column in the sprite.

Next, I added collision detection between the bullet and the enemy ship.  This was accomplished through a series of CMP, BCS, and BCC statements which check to see if the bullet’s x and y position are within the enemy sprite.  I subtracted 4 from the left and top bounds of the enemy ship, so that a collision is detected when the bullet’s x or y is equal to the enemy ship’s x or y, since there is no “greater than or equal to” operator.  When the bullet collides with the enemy ship, the bullet alive variable is set to #$00.  Then JSR is called to execute the code to increment the player’s score.  This collision code just checks to see if the bullet’s x, y location is inside the enemy ship rectangle to make things simple.  Modifying the code to do rectangle/rectangle would complicate things too much for this simple game.

The next step was to get a simple sound to play when a bullet is shot, which I got working by following this tutorial.  This just plays a simple beep, and I modified it so that it doesn’t continually play by enabling the length counter and setting it to 0001.

Two enemies on screen with six digit score

Two enemies on screen with six digit score

I added a second enemy by adding to the enemy array defined in the object script, and set the appropriate address values for the x, y, and tile index values.  For now, I just duplicated all of the bullet collision and enemy movement code for the second enemy.  I added a new “gametime” varaible that gets incremented on every NMI interrupt break.  When the gametime variable is equal to #$FF, then both enemies are set to alive and their y position are set back to a position on screen.  This gives the appearance of new enemy ships spawning.

In order to have a game over state, I added a new variable to track the player’s lives.  Whenever the player’s ship collides with an enemy ship, a new subroutine is called which subtracts one from the player’s lives, and set the game state to “GAME OVER” if the number of lives are equal to zero.

Using my sprite editor, I created a title graphic for the game.  However, I quickly found that it isn’t so easy to change all of the background tiles on the screen at once.  I tried a few things, but I had little luck.  After digging around on some forums, I found that it really isn’t possible to update the entire background in one update, like updating the screen in modern game programming environments.  One poster said that it’s only possible to update 3 rows or columns in one update, or the game will start to slow down.  For now I’m leaving the title screen out, but I’m hoping to eventually get it working in the game.

spacedude05

Title screen… to be added… hopefully.

Overall, I’m happy with what I was able to accomplish in a relatively short period of time.  I’ve decided to give a 20 minute Lightning Talk on the process of creating a NES game using 6502 assembly at the CodeStock technical conference in Knoxville next month (July 2014).

Download and play Space Dude here

Resources:

Nerdy Nights at NintendoAge

NesDev : Wiki,   NES Coding Competition, NES Tech FAQ

Programming M.C. Kids

All I need is to play some samples now.

ufo1ufo2

I am surprised I reached it so far. The collision was something I was afraid because CPC+ hardware sprite do not have collision detection (like the C64). The screen is HW scrolled and I just render the new incoming tiles at the right side. So, I don’t have a full map to track which tiles are solid in comparison with the hardware sprite. But I did manage to keep track of floor/ceiling edges in an array and compare the Y coordinate of the UFO with these incoming data. And it worked perfectly, tweaked it even to be precise. I am so happy about that!

Then I am surprised how much easier my job was with some great CPC+ capabilities. Easily to setup raster with line interrupts (almost no need for perfect NOP synchronization). And then drop few more sprites for the energy bar and LVL number and they stay there and are even another layer to the scrolling background, with no crazy programming effort. I love the CPC+! If only the original CPC had the same hardware chip..

Another feature of the CPC+ is some DMA chip to transfer data fast to the sound chip, many times per second. I know it’s used to play sampled sound effects, I just don’t know how easy it will be to use it and there is not enough time. Maybe this will be the next I will try, also maybe make the passage more narrow every other level (right now just the colors are changing every time a level is passing), and maybe some score (I have a lot of hardware sprites to abuse) and in the future some enemies/bonus (I don’t think I’ll finish this now). At least now it’s playable enough, more than just a scrolling preview, you can loose and reset to the beginning, or pass levels.

Tags: CPC, MiniLD #52

Little Hardware, Big Challenge

This Mini-LD hasn’t turned up as many entries so far as I expected, but given the challenge that it can be to program anything for some of these old platforms, I guess I can’t be too surprised.  It actually makes me wonder how many people thought they were going to participate, and then just gave up along the way.  I even hit one of those points myself.

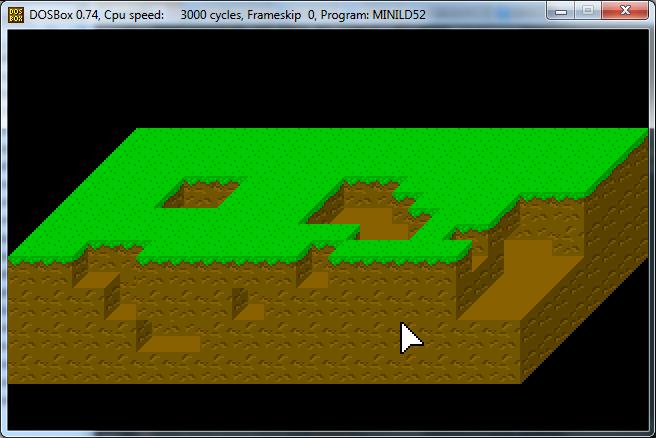
My game started out as something different altogether.  I had no idea what I was going to make before it started, I’d only practiced blitting some tiles on the screen and trying to get a feel for the VGA hardware.  After the competition started, though, I got it into my head that I was going to do a Minecraft-ish style of game, since I make mods for the real Minecraft, and have even experimented with my own voxel engine.  I could quickly envision what I had in mind, so I whipped up some simple graphics, and after a day or two I managed to have code together that could render tile-based cubes drawn in an oblique perspective.


Scrapped Mini-LD52 attempt


That mouse cursor you see could in fact click blocks and remove them from the grid, and the arrow keys panned all around.  But, there were a couple of problems.

The first is the issue of depth.  You can already see in that picture, particularly around the bottom left, how when you delete blocks from the front-most rows that they tend to bleed right into the rows farther behind.  I tried to combat this by giving blocks a defined edge, but this actually didn’t help; it just made the perceived depth bleed together two rows apart instead of one.

The other problem was performance.  Each cube is four tiles.  The order that the tiles are drawn is also very important.  You have to draw the grid from back to front, bottom to top.  You can skip drawing tiles for blocks which have blocks around them, which does help performance.  But the issue is what to do when you change the structure.  If you delete just one block, then the entire thing has to be redrawn.  I tried to think of ways to avoid this, like making special tiles to represent blocks beside one another with already-connected surfaces drawn on them, so that I could potentially only draw onto the screen the parts that were changed (maybe).  But if I was to have multiple kinds of blocks, then I was going to need combination tiles of every possible combination.  And even if I had tiles like that, it wouldn’t necessarily help at all if I were deleting blocks from deeper inside the structure.

In other words, deleting a block caused a noticeable hiccup until the grid drew back in, and I’m not really smart or patient enough to solve it!

Eventually I decided it just wasn’t practical.  And it was more of just a gimmick than an actual game, since I could have never had sprites moving through the terrain without more problems of dealing with depth and redrawing, so I scrapped it.  Which sucked, because suddenly I had no ideas.

On a side note, that mouse cursor is completely software-based.  When running in unchained VGA mode 13h, the standard mouse cursor is all messed up, still expecting a non-planar video memory arrangement.  So I’m having to capture what’s behind the cursor, draw it, then on the next frame, draw back the captured area to erase the cursor, capture the area of where the cursor moved to, then draw the cursor on the screen again.  So much work and processing just for something simple that we take for granted today!

And in case you’re wondering what I mean when I say “unchained” VGA, it basically means you’re tweaking registers in the card, turning VGA mode 13h (320x200x256) from a nice mode where video memory is one byte per pixel and linear into a more difficult to program mode where each byte is every fourth pixel, forcing you to switch between planes of video memory to write to the ones in between.   But this allows you to access all of the card’s video memory for things like panning, scrolling, double-buffering, etc, as well as doing some tricks like fast blitting from the vram using the card’s latches.

I was going to write about how I did my final game, too, but perhaps I should save that for another post at this point!


Planvas – Art Experiment

A while back I tried to make a worm game, But created this instead.

You choose a color (Through spacebar or the 123 keys) and overlap to make more vibrant colors and move around to draw,

See an example:

/me sucks at flowers

I suck at flowers

So I’d just like to see your thoughts on this “thing”

http://oranebeast.itch.io/planvas/

Tags: art, experiment, plug, plz, THIS, try

Comments

Tosic
26. Jun 2014 · 15:27 UTC
Nice flower, bro…

Dodge on Steam Greenlight

Steam link

More limited versions:

Ludum Dare version

Game Jolt version

Runner 2014-06-25 17-44-45-15

Dodge is a minimalist arcade game involving the act of dodging squares. In the eventual Steam version, this would be possible to do infinitely, as in other versions, or it would be possible to complete prepared levels. A level editor is included. The eventual Steam version would be greatly improved over the other versions, shipping with a level editor, 50 levels (they take about 10 seconds each, if done in one try), more customisation for the endless Level Infinity, and a few other things that I don’t care to mention.

Feel free to vote it up. Or down, if you really want to.

Tags: LD#26, postcompo, SuccessStory, successtory

Who shall claim the trophy first?(POST CLOSED)

cooltree Hi!

As you (probably) know, I built the Tree OS to celebrete the ending of my fifth grade!

In the mentioned OS there is a game called quiz! (BTW, to start the quiz, type in command games; then type in quiz and choose your difficulty (you need to answer all of them, the order doesnt matter) There are three difficulties (easy, medium, hard) and 5 questions for each! Whoever posts correct answers (just numbers in front of correct answers) on all of them (in comments section below) will get a True Game Dev Trophy!!!

Hurry up and download Tree OS, play the game, and, hopefully get the trophy (I will say it in the post when the trophy has been handed over to the winner)!

WHO SHALL CLAIM THE TROPHY FIRST, THE DICE HAS BEEN THROWN!!! 😀

— POST CLOSED!!! WINNER HAS COME!!!

Comments

26. Jun 2014 · 20:19 UTC
I couldn’t find the questions, and what did you use to make this? thanks!
Tosic
27. Jun 2014 · 03:18 UTC
To find questions type in ‘command games’ and then type in ‘quiz’, then choose difficulty.

I can’t tell you what have I used (’cause it is one of the questions in the quiz), but I will say that after the winner claims the trophy!
27. Jun 2014 · 12:33 UTC
Let’s see if I can remember it from when I played it…

easy

3 1 2 4 2
27. Jun 2014 · 12:35 UTC
Also, I don’t think you should call the trophy “True Game Dev”, because if you know the answers it doesn’t make you a game developer at all. You just know the answers. That’s all.
YarharALC
28. Jun 2014 · 04:06 UTC
Easy

1. 3

2. 1

3. 2

4. 4

5. 2